
How to Use a Nail Drill for Beginners
If you want faster, cleaner gel prep and gel removal at home, or you just bought your first electric nail drill for salon work, you may feel confused by countless speed gears and various drill bits. Many new users accidentally thin natural nails or cause burning due to wrong operations.
This complete beginner tutorial covers all core skills: matching drill bits for different services, reasonable RPM speed settings, standard operation angles, and common mistakes to avoid. With 14 years of manufacturing experience, JIMDOA has served salons, training schools and home users across 60+ countries. We summarize all real problems from new operators to help you achieve salon-grade nail effects safely.
Pre-Work Preparation Checklist
- Before operating the nail drill, prepare all supporting tools to guarantee safety and smooth operation:
- Brushless electric nail drill (low heat & low noise, best for newbies)
- Complete drill bit set: medium carbide cone, fine ceramic cylinder, small barrel, diamond bit, sanding bands with mandrel
- Nail dust collector (prevents inhalation of harmful nail powder)
- Cuticle oil (moisturize nails post-grinding)
- Practice artificial nails for beginner training
- Bright lamp & stable desktop surface
Beginner Tip: Start with corded nail drills in your first practice. Stable constant power makes speed control much easier before switching cordless portable models.
Nail Drill Bits & Corresponding Applications
Matching the right drill bit is the most critical skill for beginners; improper bits are the top cause of thin nails and heat damage. Here are 5 essential bits for all manicure work:
Medium Coarse Carbide Cone (15000–25000 RPM)
Mainly for gel polish & acrylic removal. Coarse carbide cuts fast without clogging; use 25000–35000 RPM for thick acrylic, forward rotation only.
Fine Ceramic Cylinder (8000–15000 RPM)
Smooth residual gel after removal, level uneven nail plates. Ceramic generates less heat, friendly to sensitive natural nails.
Fine Small Barrel Bit (3000–8000 RPM)
Precise care for cuticles and nail free edges. Keep slow speed and parallel contact with nails.
Sanding Band (10000–18000 RPM)
Disposable sleeve for callus removal and rough nail shaping, high hygiene for salon multi-client use.
Ultra-Fine Diamond Bit (2000–6000 RPM)
Delicate sidewall & cuticle detailing for fragile skin; only use light gliding strokes without pressing hard.
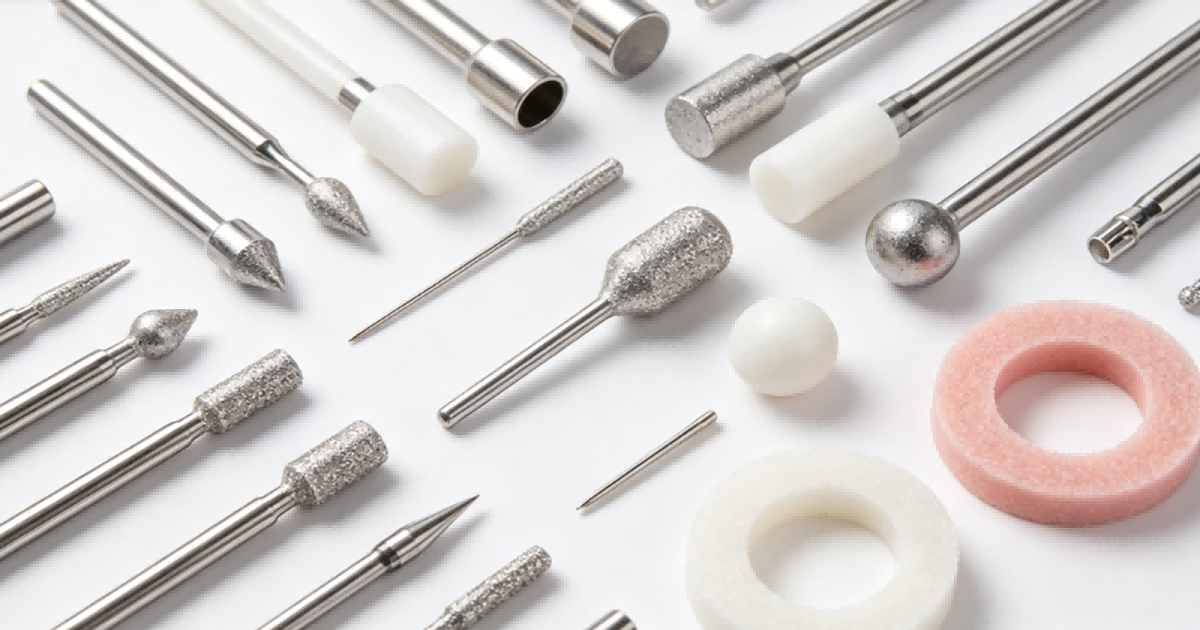
Warning for New Users: Never use coarse carbide bits on bare natural nails or near cuticles at full RPM. The finer the bit and lower the speed, the closer you work to skin and natural nail plates.
Standard Step-by-Step Operation ——Gel Removal Demo
Gel removal is the most frequent practice task for beginners, follow these 9 standardized steps:
|
Step No. |
Action Step |
Key Operational Points |
|
① |
Activate dust extraction |
Position and turn on the dust collector; align the hand with the suction inlet |
|
② |
Install the drill bit |
Insert a medium-coarse carbide cone bit; pull gently to ensure it is secure |
|
③ |
Set initial speed |
8,000–10,000 RPM for beginners; increase to 15,000–20,000 RPM once proficient |
|
④ |
Select rotation direction |
Use forward rotation for standard gel removal; use reverse rotation for large, thick nail extensions |
|
⑤ |
Adjust filing posture |
Rest forearm flat on the table; hold the bit at a 15–20° angle to the nail; avoid pressing down vertically |
|
⑥ |
Control filing technique |
Use continuous horizontal sweeping motions; lingering in one spot causes heat buildup and nail burns |
|
⑦ |
Determine filing sequence |
File from the center of the nail toward the tip; avoid filing the free edge directly at the start |
|
⑧ |
Switch bits for refining |
After removing the gel, use a ceramic bit to level the surface and a fine barrel bit to clean the cuticle area |
|
⑨ |
Post-procedure nail care |
Remove dust and wipe the nail surface; apply cuticle oil to hydrate and nourish |
Factory Practical Tip: Most nail irritation injuries come from static grinding. Constant movement evenly disperses heat; let the rotating bit do all the polishing work instead of pressing hard.
Universal RPM Speed Reference Chart
|
Service Task |
RPM Range |
Recommended Drill Bit |
|
Gel polish removal |
15,000–25,000 |
Medium carbide cone |
|
Thick acrylic removal |
25,000–35,000 |
Coarse carbide barrel |
|
Nail surface smoothing |
8,000–15,000 |
Fine ceramic cylinder |
|
Cuticle precise care |
3,000–8,000 |
Small barrel / diamond bit |
|
Foot callus exfoliation |
10,000–18,000 |
Sanding band + mandrel |
|
Natural nail shaping |
5,000–10,000 |
Fine ceramic bit |
|
Beginner first practice |
8,000 starting |
Any soft fine bit |
5 Mandatory Safety & Hygiene Rules
- Equip nail dust collector every time; inhaled acrylic dust harms respiratory health.
- Reusable carbide/ceramic/diamond bits must be fully disinfected between salon clients.
- Sanding bands are single-use only, replace after each customer to avoid cross-contamination.
- Check nail temperature every 30–60 seconds; pause and slow down if nails feel hot.
- Do not drill thin, cracked, damaged natural nails; switch to manual nail files instead.
FAQ Common Questions
Q1: Is it safe to use a nail drill at home?
A: Safe with standardized operations: start under 10000 RPM, keep the bit moving and match suitable bits. JIMDOA brushless drills run cooler and quieter than cheap coreless models, much friendlier for home beginners.
Q2: What RPM should total beginners choose?
A: 6000–10000 RPM for all first practices. You can raise speed after mastering grip and angle control.
Q3: Can electric drills work on natural nails?
A: Yes, only low speed (3000–8000 RPM) with fine ceramic/diamond bits. Stop immediately if white nail powder or hot sensation appears.
Q4: Which drill bits should newbies prepare first?
A: Medium carbide cone (gel removal) + fine ceramic cylinder (smoothing). Master these two before adding cuticle diamond bits.
Q5: How to pick a beginner-friendly nail drill?
A: Prioritize brushless motor, full 0–35000 digital RPM, lightweight handpiece under 100g, universal 3/32" drill bit interface. JIMDOA entry series are specially designed for training and home use.
CTA Purchase Guidance
Starting your nail art journey is exciting, but choosing your first nail drill machine can be overwhelming. A beginner-oriented machine is the true foundation of your skills. Without proper equipment, you might face frustrating issues like hand fatigue, excessive heat, or uneven polishing.
To build confidence and learn safely, you need a machine with low vibration, consistent temperature control, and a clear digital speed display. If you’re still confused about picking the right model that fits both your budget and practice needs, our entry-level JIMDOA nail drill collection is tailored just for you. Every model in this series meets these core standards, featuring stable brushless motors, adjustable 0–35,000 RPM digital controls, and lightweight handpieces.
Ready to take your nail art to the next level? Explore our professional nail drill collection today to find the perfect match for your home practice or future salon use.